Effortless Scripting in Godot 4 with Visual Studio Code: A Step-by-Step Guide
Introduction
Are you a Godot developer looking to optimize your workflow? As a developer, it's common to spend a significant amount of time writing and debugging code in your preferred editor, and having a pleasant user experience is crucial to maintaining productivity and efficiency. That's where Visual Studio Code comes in. As one of the most popular and versatile text editors available, Visual Studio Code offers a wealth of features and extensions that can help streamline your Godot development process. Whether you're a beginner looking to make your first game or an intermediate developer trying to level up your skills, this step-by-step guide will help you set up your development environment. In this article, I'll guide you through the process of integrating Visual Studio Code with Godot, so you can take advantage of its powerful tools and workflows for your Godot projects. Let’s get started.
Installing Visual Studio Code and Godot 4
Downloading and installing Godot and Visual Studio Code
Let's kick off by downloading the Godot 4, or simply 'Godot', and Visual Studio Code (VS Code) installation files. To do so, follow these steps:
Head over to the official Godot Engine website and download the latest version that's right for you. There are two options to choose from:
Godot Engine 4.0.1: This version is perfect if you plan to use GDScript, Godot's built-in programming language.
Godot Engine - .NET: If you prefer to use C# or a combination of C# and GDScript, this version is for you, as it comes with C# support.
When the download completes, extract the contents of the .zip file to a folder on your computer. Note that if you intend to code your Godot projects in C#, you have to download and install the Microsoft .NET 6.0 SDK, if you don’t already have it installed.
Visit the official VS Code website and download the appropriate installer for your operating system.
Install and run the downloaded files:
To run Godot 4, navigate to the extracted folder and run the executable file.
VS Code: Open the installer and follow the on-screen instructions to install. After completing the installation, launch VS Code.
Now that you have Godot and VS Code installed and running, it’s time to explore the main content of this article. Let’s dive in!
Prepping Godot for VS Code Integration
Setting Up VS Code as Godot’s External Editor
Now let's set up Visual Studio Code as Godot's external editor. Here's what you need to do:
Open Godot and start a new project by clicking ‘New Project’ on the left side of the window.

Name your Project in the pop-up window, create a folder, and click ‘Create & Edit’.

In Godot, scripts are written in GDScript or C# and attached to nodes to define their behavior and manipulate them. Create a simple 2D Node by clicking on "Node2D" in the Scene dock on the top left side of the window.

Go to Editor Settings by clicking on the Editor menu in the top-left corner of the screen and selecting “Editor Settings”.

In Editor Settings, go to the “Text Editor” section on the left-hand side of the window. Find and click “External Editor” to display the external editor settings.
Complete the following steps to configure VS Code as Godot's external editor:
Toggle on the “Use External Editor” setting.
Find and copy the absolute path of your Visual Studio Code .exe file into the ‘Exec Path’ field.
Fill the ‘Exec Flags’ input field with this value:
{project} --goto {file}:{line}:{col}
Back in the editor settings, click on the “Language Server” setting in the “Network” section and take note of the ‘Remote Host’ IP address and ‘Remote Port’ value in the settings window.

Close the editor settings.
That's it for Godot, for now. Next, I’ll guide you through the process of setting VS Code up to connect to Godot.
Setting VS Code up to connect to Godot
Installing the Godot Tools extension for VS Code
The Godot Tools extension for Visual Studio Code is a set of tools designed to enhance the development experience for Godot game developers who use VS Code as their code editor. It provides features such as code completion and error highlighting, as well as integration with the Godot editor to allow for seamless debugging and launching of your projects directly from VS Code.
To install the Godot Tools extension, follow these steps:
Open Visual Studio Code and click on the Extensions icon in the left-hand sidebar.
Search for "Godot Tools" in the search bar at the top of the screen.
Click the "Install" button next to the 'godot-tools' extension and wait for the installation to complete.
Click the ‘Reload’ button to activate the extension.

Setting up Godot Tools to connect to Godot for GDScript development
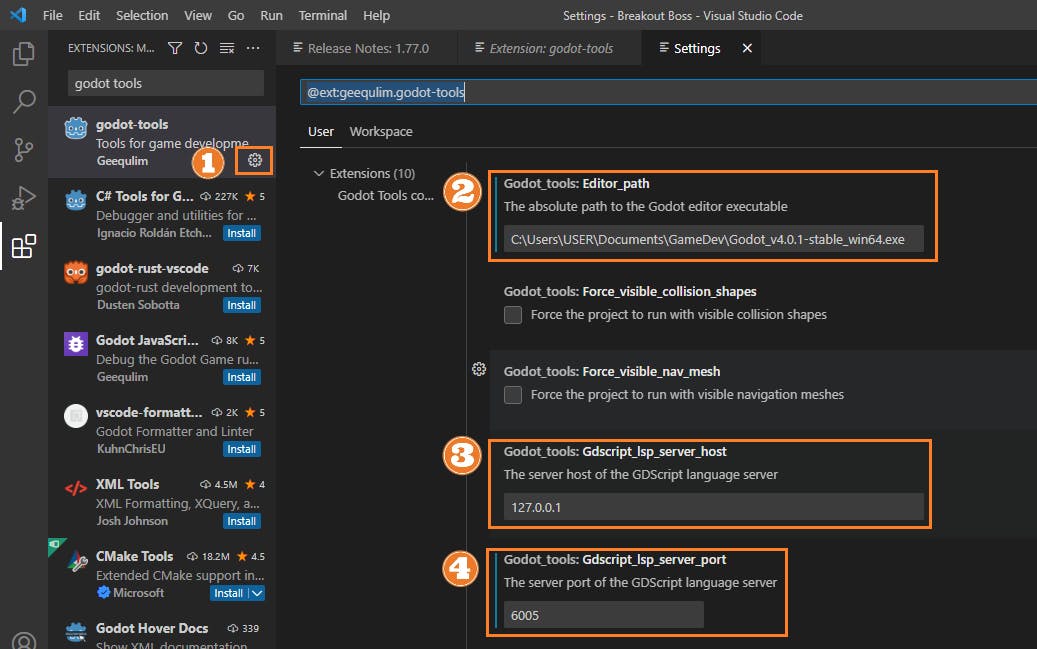
To enable the external editor, VS Code, to communicate with Godot, making it possible to edit and debug Godot scripts, we need to provide Godot Tools with the following values:
The absolute path to the Godot executable.
The ‘Remote Host’ IP address copied from Godot.
The ‘Remote Port’ value copied from Godot.
Do it like this:
Click on the settings icon to the right of the install/uninstall button.
Click on the input field of the
Editor_pathsetting and fill in the absolute path to your Godot editor executable.Click on the
Gdscript_lsp_server_hostinput field and check to confirm that its value matches the ‘Remote Host’ value found in the Godot editor language server setting. If they vary, modify the value in Godot Tools to match the one found in Godot.Click on the
Gdscript_lsp_server_portinput field and check to confirm that its value matches the ‘Remote Port’ value found in the Godot editor language server setting. If they vary, modify the value in Godot Tools to match the one found in Godot.
Voila! You're all set to edit/debug your GDScript projects in VS Code. Next up, I'll walk you through setting up VS Code for scripting in C#.
Setting up VS Code for C# scripting in Godot
C# is a versatile programming language with benefits that make it a popular choice for game development. You can take advantage of C# scripting in Godot by modifying Godot editor settings to support external C# scripting and installing the 'C# for Visual Studio Code' extension in VS Code. These steps will show you how:
Open the Godot Engine and click on ‘Editor Settings’.
Find the 'Mono' setting at the bottom of the settings list and click on the nested ‘Editor” setting.
Click on the 'External Editor' drop-down menu on the right side of the screen and select “Visual Studio Code” from the list of options.

Open Visual Studio Code and click on the Extensions tab.
Type “C#” into the search bar and click ‘C# for Visual Studio Code’ by Microsoft.
Install the extension.

You’re all set! Ready to start scripting your Godot projects in VS Code? It’s time for a quick demonstration.
Creating/Editing Godot Projects in VS Code
Head back over to Godot and follow these steps:
Open your Godot project and navigate to the node you want to attach a script to.
Right-click the node and select "Attach Script" from the context menu.

In the dialog that appears, choose the scripting language you want to use for your script
Choose a name for your script file.
Click "Create".

VS Code will open with a basic template for your new script. Write your code and save the file.
Now you can edit the script in VS Code, and it will affect the behavior of the node it is attached to in your Godot project.
Conclusion
Godot 4 and VS Code make a powerful combo for game devs! With these tools, you can take advantage of Godot's powerful engine and VS Code's features to make amazing projects. So go ahead, give it a try, and keep learning.
